Go and OpenAPI/Swagger: Documenting REST APIs the Right Way
Hey everyone!
Documenting REST APIs is boring. But it’s necessary. And when you do it right, you get:
- Clients who understand your API without asking
- Documentation that’s always up to date
- Tools that generate code automatically
- Less support and more productivity
The problem is that manual documentation always gets outdated. And nobody likes writing documentation.
The solution? OpenAPI/Swagger with automatic generation from code.
This post shows how to document REST APIs in Go the right way.
What you’ll find here
This guide covers everything you need to document REST APIs in Go:
- Why OpenAPI/Swagger: what it is and why use it
- Available tools: swaggo, go-swagger and others
- Documentation strategies: code-first vs spec-first
- Practical implementation: step by step with swaggo
- Best practices: what to do and what to avoid
Each section has practical examples and decisions you need to make.
1. Why OpenAPI/Swagger
What is OpenAPI
OpenAPI (formerly Swagger) is a specification for describing REST APIs. It’s a YAML or JSON format that defines:
An OpenAPI spec defines:
- Endpoints (paths)
- HTTP methods
- Parameters and responses
- Data schemas
- Authentication
- Examples
Why use OpenAPI
1. Always up-to-date documentation
When you generate the spec from code, documentation never gets outdated:
The flow is simple:
Go Code -> OpenAPI Spec -> Swagger UI (HTML)
Everything always synchronized automatically.
2. Automatic code generation
With an OpenAPI spec, you can generate:
- Clients in multiple languages
- Servers in multiple languages
- Automated tests
- Mocks for development
3. Validation tools
OpenAPI allows validating:
- Requests against the spec
- Responses against the spec
- Contracts in tests
4. Tool integration
- Postman imports OpenAPI
- Insomnia imports OpenAPI
- Swagger UI renders visually
- Redoc creates beautiful documentation
2. Available tools
Comparison of main tools
| Tool | Approach | Complexity | Maintenance |
|---|---|---|---|
| swaggo/swag | Code-first | Low | High |
| go-swagger | Spec-first | Medium | Medium |
| oapi-codegen | Spec-first | Medium | High |
| openapi-generator | Spec-first | High | Medium |
swaggo/swag (recommended to start)
Advantages:
- Annotations in Go code
- Automatic spec generation
- Integrated Swagger UI
- Easy to get started
Disadvantages:
- Annotations can clutter code
- Less flexible than spec-first
When to use:
- New or small projects
- When you want to start quickly
- When documentation comes from code
go-swagger
Advantages:
- Spec-first (more control)
- Generates code from spec
- Automatic validation
Disadvantages:
- More complex to configure
- Need to keep spec and code synchronized
When to use:
- Large and complex APIs
- When you need full control
- When multiple teams work on the API
3. Documentation strategies
Code-first vs Spec-first
CODE-FIRST (swaggo):
Go Code -> Annotations -> OpenAPI Spec -> UI
The source of truth is the code.
Advantages:
- Faster to start
- Documentation always synchronized
Disadvantages:
- Annotations can clutter code
SPEC-FIRST (go-swagger):
OpenAPI Spec -> Generate Code -> Implementation
The source of truth is the spec.
Advantages:
- Full control over spec
- Can generate code for multiple languages
Disadvantages:
- Need to keep spec and code synchronized
Which to choose?
Code-first (swaggo) if:
- You already have Go code
- Want to start quickly
- Documentation is secondary
Spec-first (go-swagger) if:
- You’re starting from scratch
- The API is the main contract
- Multiple teams/languages
4. Practical implementation with swaggo
Step 1: Installation
1
go install github.com/swaggo/swag/cmd/swag@latest
Step 2: Basic structure
With swaggo, you add annotations to handlers:
1
2
3
4
5
6
7
8
9
10
11
12
// @Summary      Create a new user
// @Description  Creates a new user in the system
// @Tags         users
// @Accept       json
// @Produce      json
// @Param        user  body      UserRequest  true  "User data"
// @Success      201   {object}  UserResponse
// @Failure      400   {object}  ErrorResponse
// @Router       /users [post]
func CreateUser(c *gin.Context) {
    // ... implementation
}
Step 3: Generate documentation
1
swag init
This generates:
docs/swagger.json- OpenAPI specdocs/swagger.yaml- OpenAPI spec (YAML)docs/docs.go- Go code with the spec
Step 4: Serve Swagger UI
1
2
3
4
import "github.com/swaggo/gin-swagger"
import "github.com/swaggo/files"

router.GET("/swagger/*any", ginSwagger.WrapHandler(swaggerFiles.Handler))
Now you have interactive documentation at /swagger/index.html.
How it looks visually
Here’s an example of how Swagger UI looks when you access /swagger/index.html:
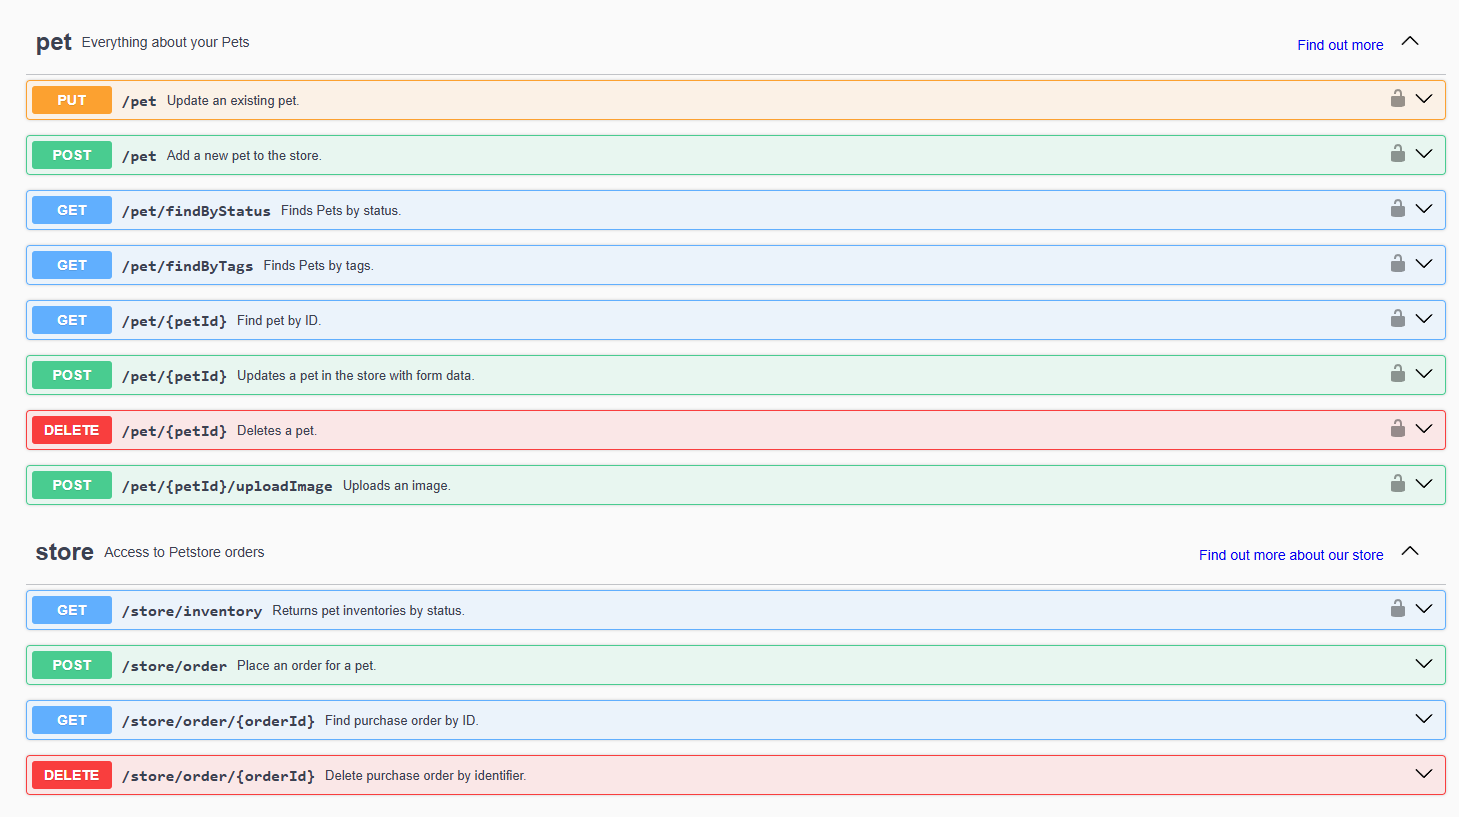
Note: This is the default Swagger UI from Petstore (official example). In your case, it would be your own API documentation, automatically generated from annotations in your Go code.
What you can do in Swagger UI:
- See all endpoints organized by tags
- See request/response schemas
- Test endpoints directly in the interface (“Try it out”)
- See code examples in multiple languages
- Validate requests before sending
To use with your own API, you can:
- Host the
swagger.jsonsomewhere public (GitHub Pages, S3, etc.) - Or simply link to
/swagger/index.htmlon your server
5. Best practices
What to do
1. Document real examples
1
// @Success      200  {object}  UserResponse  "Example: {\"id\": 1, \"name\": \"John\"}"
2. Document common errors
1
2
// @Failure      400  {object}  ErrorResponse  "Invalid email"
// @Failure      409  {object}  ErrorResponse  "User already exists"
3. Use tags to organize
1
2
// @Tags         users
// @Tags         authentication
4. Document authentication
1
2
// @Security     BearerAuth
// @Security     ApiKeyAuth
5. Keep schemas consistent
Use reusable structs for requests/responses:
1
2
3
4
5
type UserResponse struct {
    ID    int    `json:"id" example:"1"`
    Name  string `json:"name" example:"John Doe"`
    Email string `json:"email" example:"john@example.com"`
}
What to avoid
1. Don’t document everything manually
Use annotations, not free-form comments.
2. Don’t forget to update
If you change code, update annotations.
3. Don’t document internal endpoints
Document only public APIs.
4. Don’t use generic examples
Use real examples that help developers.
Conclusion
Documenting REST APIs doesn’t have to be boring. With OpenAPI/Swagger and tools like swaggo, you get:
- Always up-to-date documentation
- Interactive visual interface
- Automatic code generation
- Tool integration
The key is choosing the right strategy (code-first vs spec-first) and automating as much as possible.
Start simple with swaggo. Add complexity as needed. And always keep documentation synchronized with code.
It’s worth the effort.
References and sources
Official documentation
- OpenAPI Specification - Official specification
- swaggo/swag - Tool for Go
- go-swagger - Complete framework
Tools
- Swagger UI - Visual interface
- Redoc - Alternative documentation
- Postman - Imports OpenAPI
Resources
- OpenAPI Generator - Generates code from specs
- SwaggerHub - Documentation platform